| Basic
printing on a Macintosh consists of 4 steps. |
| 1. Selecting
the printer from the "Chooser" |
| 2. Selecting
and adjusting "Page Setup" from within the application |
| 3. Selecting
and adjusting the "Print" command from within the
application. |
| 4. Printing
and using the "Print Monitor" application. |
| |
| More
Detail |
| 1)
Select "Chooser" from the Apple menu in the upper
left of your screen. |
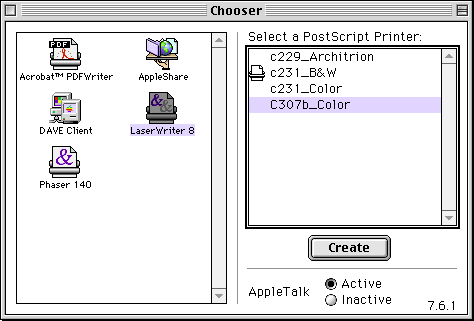 |
- Once
in the "Chooser" select the "LaserWriter
8" driver from the box on the left.
- When
this is done a list of printers will appear in the window
on the right.
- We
use the convention of "Room number"_"Printer
Type". For example c231_Color or c307b_B&W. Never
select printers that do not follow this convention (ex.
HP4V or HP5000 etc...).
- Select
(single click) the printer you wish to print to. Do not
double click it.
- Never
hit the "create" button on the lower right or
double click any of the printers. This tries to create
a desktop printer. We don't want to do this. Because of
the copy protection on the machines this can slow down
the machine and/or make it crash.
- Please
note* that the driver selections(ie Laserwriter, PDFwriter
etc.) may be in a different arrangement than that of this
example.
|
| 2)
Select "Page Setup" from the" File Menu"
of your application. |
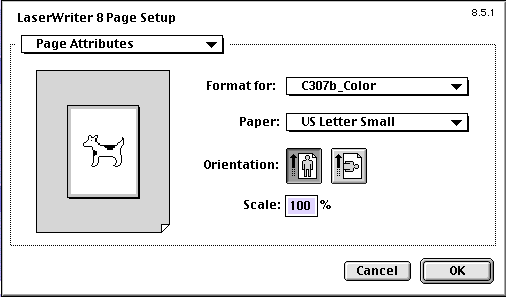 |
- Page
set up binds the selected printer with the current document.
- This
is a the place to check your paper size and printer selection.
- Application
specific options are sometimes found in "Page Setup"
Please look for them.
|
| 3)
Select "Print" from the "File Menu" |
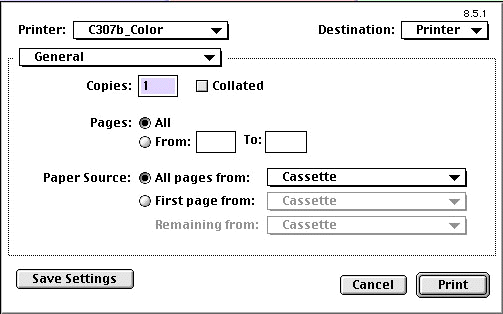 |
- The
"Print" dialog box is different for each application.
- Many
application specific options are available here.
-
Check the drop down menu in the upper right (general).
|
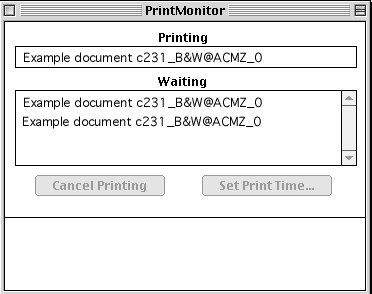
| 4)
Printing and the print monitor application |
 |
|
A few
seconds after your print job is processed a small application
called the "Print monitor" should launch and be
available in the application menu on the upper right of
your screen.
You
will notice a print list
- The
job currently printing (Printing)
-
Other jobs waiting to be printed. (Waiting)
If a
student from the previous class was printing and turned
the computer off before the job was sent to the printer
it will probably be in the list ahead of yours.
You
may delete jobs by highliting them and pressing delete job.
Please
note*: If there are jobs from you or the last class in the
print list your machine may slow down to a crawl or crash.
If you experience these symptoms check to see if jobs are
printing or waiting.
|
| Other
printer tips and no no's |
|
If
its not printing.
- "Dont
send it again"
untill you figure out whats going on. You will make things
worse not better.
- Check to see
if you are printing to the correct printer.
- Check that
there is not a paper jam in the printer.
- Make sure
you are sending a paper size the printer has.
- Our printers
support only 8.5 x 11 or in some rooms 11 x 17 size paper.
- If you are
trying to print with a papersize other than these supported
sizes the printer will stop and wait for you to manually
feeda sheet of paper this size. If you see a message on
the printer display that says "manual feed"
or "Form Feed" it is asking you to feed a sheet
of paper. No printing will happen untill the printer gets
its paper. Please tell your Teacher, Lab monitor or call
7484 for assistance.
|
|
Why
do I have to go through these steps each time I print. I
don't have to do this at home or in my office?
Our computers
are public computers used by a variety of people each who
may have different printing needs. Chances are the person
before you my have changed some of the preferences within
the application or might not know what is going on. It is
a good idea to mechanically go through these steps each
time you print for the first time within a room or lab.
After you have set things up you can continue to print without
adjustments.
|
 |